Uninstalling Microsoft Teams: What happens to your data?
If you’re thinking about uninstalling Microsoft Teams, you may be wondering what will happen to your chat history and files. Well, the answer depends on how you’ve set up your Teams account.
If you’ve enabled cloud storage and chat history in Teams, you can rest easy knowing that your data will be retained even after uninstallation. That means you can still access your chat history and files by simply logging into Teams from any device or through the Microsoft Teams website.
However, if you’ve chosen to store your data locally, uninstalling Teams could result in the loss of your chat history and files. So, it’s important to keep this in mind before making the decision to uninstall Teams.
Remember, your data is valuable, and we want to ensure you have all the information you need to make the best choice for yourself.
Step 1: Quit Teams
To close the application, right click on the Team icon in the dock and select “Quit”.
Step 2: Open Finder & Navigate to Applications
In the Finder window, click “Applications” in the sidebar.
Step 3: Locate Microsoft Teams
Find Microsoft Teams in the list of applications.
Step 4: Move Teams to Trash
Right click on Teams and select “Move to Trash”.
Then, empty the Trash by right clicking on the Trash icon in the dock and selecting “Empty Trash”.
Remove Any Residual files
While the above method allows you to uninstall Teams, it may leave behind some residual files. Follow the procedure below to remove any Microsoft Teams leftover files from Mac manually.
Open finder and select Go > Go To Folder.
Open the following directories and delete the folder and files next to each of them;
After you complete the above, empty the trash and restart your Mac computer.
What to do if Teams Reinstalls itself?
If you experience an issue with Microsoft Teams reinstalling itself after you have uninstalled it, there are a few extra steps you can take to fix it.
Remove Teams from Startup: Open the Task Manager by pressing Ctrl + Shift + Esc. Go to the “Startup” tab and disable Teams from running at startup.
Clear the Teams Cache: Press the Windows key + R to open the Run dialog box. Type “%appdata%\Microsoft\Teams” and press Enter. Delete all the files and folders within the Teams folder.
By following these tips, you should be able to resolve the issue of Teams reinstalling itself on your Mac, however, if you need further assistance, you are welcome to contact KeyTech IT Support
Step 1. Check if Microsoft Teams is Already Installed
Before you begin the installation process, it’s a good idea to check if Microsoft Teams is already installed on your computer. Follow these steps:
Click on the Start button, located in the lower-left corner of your screen (the Windows logo).
In the search bar, type Teams and press Enter.
If Microsoft Teams is already installed, you’ll see it in the search results, and you’re all set to use it. If not, proceed with the installation steps below.
Please Note: If you have the wrong version of Microsoft Teams, you may experience login issues or have limited functionality. If you accidentally install the wrong version, you may need to uninstall it before proceeding with the correct version. Steps to uninstall Teams can be found here.
Step 2. Find Microsoft Teams Download
Open your preferred web browser and go to the official Microsoft Teams download page. Alternatively, you can log in and download directly from your Microsoft account.
Step 3. Choose Your Version
Choose between Teams for personal use and Teams for work or school. Since you’re installing it for work or school, click on Download Teams under the “Teams for work or school” section.
Step 4. Download the Executable File
Once you’ve clicked the button under the chosen version, a download will begin automatically. This is the installer for Microsoft Teams.
Step 5. Install Microsoft Teams
Once the download is complete, locate the file you just downloaded (usually in your Downloads folder).
Double-click on the executable file to start the installation process.
A window will appear, guiding you through the installation steps. Follow the on-screen instructions to proceed.
You might be asked for permissions to make changes to your device. Click Yes or Allow to continue.
The installer will start extracting and installing Microsoft Teams on your computer.
Step 6. Sign In to Microsoft Teams
After the installation is complete, the Microsoft Teams application will open automatically.
You will be prompted to sign in using your Microsoft credentials (email and password). Enter the required information and click Sign In.
That’s it! You’ve successfully downloaded, installed, and signed in to Microsoft Teams on your Windows computer. You can now start using Teams to collaborate, chat, and conduct meetings with your colleagues or classmates.
If you have installed the wrong version of Microsoft Teams or if you need to switch from one version to another, you may need to uninstall the incorrect version before installing the correct one. Here’s how you can uninstall it from Windows:
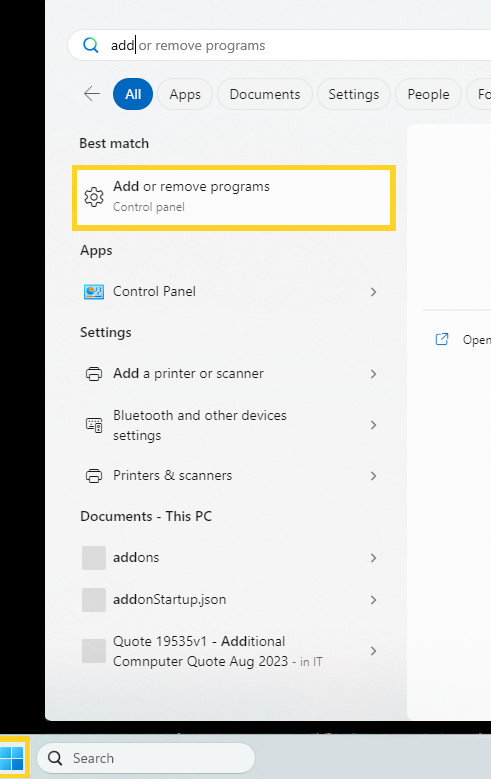
Press the Start button (Windows logo) in the lower-left corner of your screen.
Search for “Add or Remove Programs” and click on it from the search results.
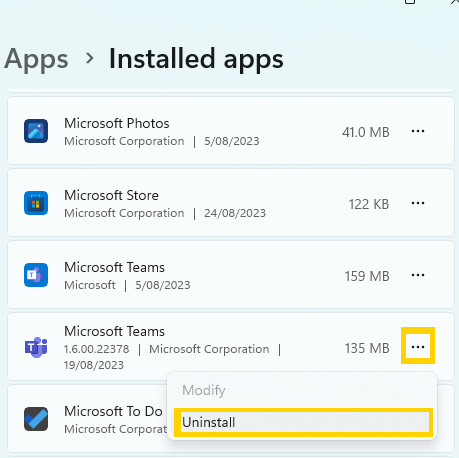
In the “Add or Remove Programs” window, locate “Microsoft Teams” from the list of installed applications.
Click on “Microsoft Teams” and then click the Uninstall button.
Follow the on-screen prompts to complete the uninstallation process.
Like all businesses, we don’t change our IT infrastructure every year. We upgrade and improve it over time. Even while providing the latest infrastructure to clients, including cloud-based systems, there was no ‘cloud’ switch to flick built into ours, and we were a very office-centric business.
That said, a move to Teams has been on our radar for a while. It makes business sense: Teams makes it easier to collaborate, share, and it means assets are accessible from a variety of places and devices. It means we can save on equipment and be more responsive and dynamic as a business.
To be real, we’d been dragging our feet on this change. Any major change to operations means some interruption to how we work. But recent developments helped us make the move. Here’s what we discovered in the process, and some tips on your own transition to Teams.
Teams tip #1: flatten your folder structure.
When your files are sitting on a drive, you can organise them however you like. But in Teams, file paths being too long is a common issue. You might need to flatten your information architecture a little, by bringing the contents of some subfolders into their parent folders, for example. And it’s best to do this before moving files, cos frankly, it’s easier to move files on the desktop.
Teams tip #2: use search and naming conventions.
Nesting files under too many subfolders should be avoided in general because it makes things hard to find. In teams, finding files is a bit easier than searching. Rather than using folders, consider using naming conventions for files.
Teams tip #3: slow and steady wins the file transfer.
Teams is getting hammered right now as many businesses are moving their files into the cloud. It can take quite a long time to upload files, particularly when OneDrive times-out. It’s especially problematic at the moment with so many people trying to migrate to Teams at once.
Teams tip #4: you still need to backup!
Having files hosted by a managed cloud service will definitely boost the security of your data. It means they are invulnerable to any insecurities with your local network.
There are still reasons to backup your data though. What if for some reason or another you are deined access by the host? It’s also possible to accidentally (or on purpose!) delete files that you still need.
It is possible to backup Teams data. Our Keycloud Backup service is the best way we know of. We can draw down your cloud data and make sure a copy exists somewhere local, and accessible to you.
It is common for most businesses to give their clients the usual communication options such as phone numbers, email addresses and links to their social media pages. These contact methods are fine and cater to a broad range of businesses and their recipients. But what...
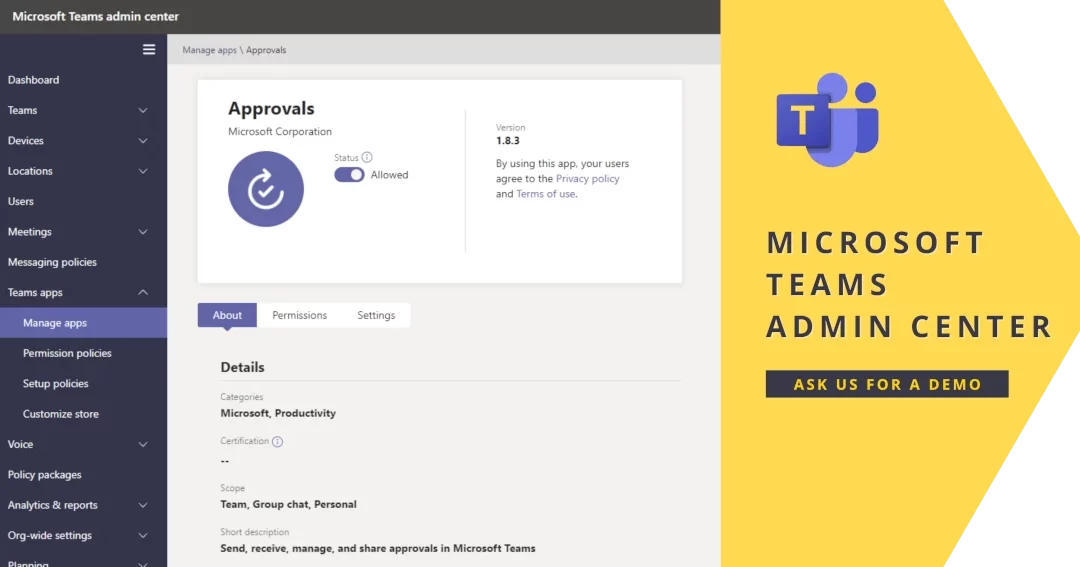
Management Tools within Microsoft Teams Admin Center If you are a Global or Teams administrator, you will find the Teams Admin Center to be a valuable tool for managing your business. With the full administration capabilities, you can manage and monitor users, apps...
Your Title Goes Here As a business owner, you’re always looking for ways to simplify and streamline your operations. That’s why we’re excited to introduce the Microsoft Teams Admin Center —a powerful new tool that allows you to perform key management...
This month, as usual, we bring you great news about big changes within the platform!
Meetings now also for iOS
Since February, joining a meeting is now easier than ever before! With just one touch you can join from your iOS device! The iPhone experience has been optimized so that your participation is more active. Reacting in a meeting, participating in chats or presenting a PowerPoint are easy tasks.
In addition to joining a meeting, it’s easier to access meeting and device controls, such as the ability to stream a PowerPoint, turn room cameras on and off, and more.
Hide or pin your videos in Team meetings
The ability to pin your own video has been expanded in Teams. Now you can see your own video enlarged on your screen or you can hide your own video during calls. This significantly reduces distractions during calls while still making your video available to other participants.
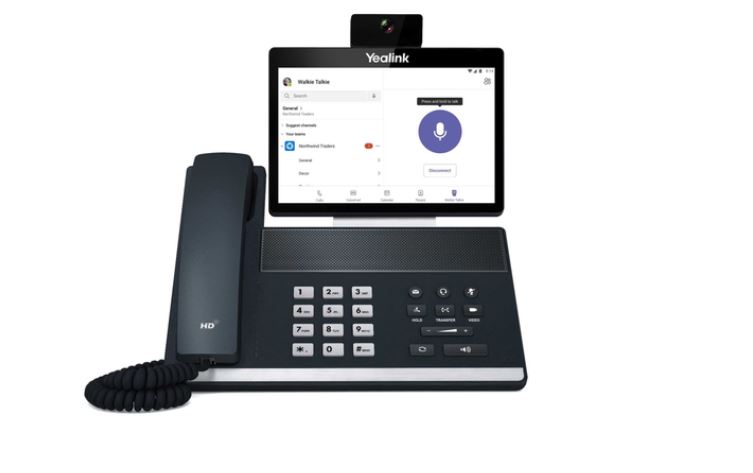
Walkie Talkie on Teams
Teams have started a Walkie Talkie-style communication feature. Now you can use push to talk by pressing a button to talk and releasing the button to listen. Walkie Talkie on Teams phone devices can only be used to communicate with colleagues who are part of the same Teams channel.
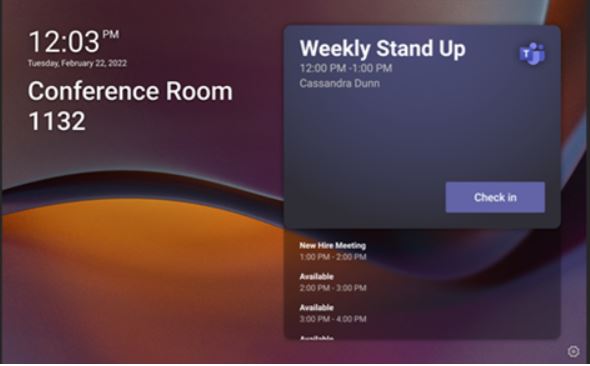
Check-in and release of rooms
This new feature in Teams allows you to get much more use out of reserved conference rooms. Meeting attendees can claim their reserved meeting room by tapping the “Sign Up” button on the panel. If no one checks into the room, it is released, permitting others to book and use the room.
Check-in “knock-knock” notification
This function lets you notify people in a meeting that their time has run out and that people are waiting for them. This feature is combined with Microsoft Teams Rooms and with the new registration button.
Multiple Featured Participants
Enjoy better meeting experiences in Teams Rooms on Android, with more videos on screen, multiple featured participants, new reactions. Notably, with the new and improved meeting experience, remote participant videos span both screens (in dual-screen meeting rooms) when content is not being shared.
Dynamism with wallpapers
You can customize the Teams Rooms home screen on Android devices with five built-in wallpapers. These wallpapers can be applied to the screens at the front of the room in single and dual-screen configurations. I.T admins can configure them from device settings, with Teams Admin Center support coming soon.
Mute notifications during meetings
With Teams, you can have your meetings without having to worry about interruptions. Users can mute notifications during meetings, which enables them to focus during meetings. A user can choose to mute notifications for all meetings or per meeting. To turn off notifications during all meetings, go to Settings -> Notifications-> Meetings & Calls and turn on the Mute notifications during meeting button. To turn off notifications during a specific meeting, click the ellipses and choose mute/allow notifications.
Pin chat messages
Pin a Team chat message to drive awareness and provide the chat members with quick access to important content. Pinning will help your team stay in sync on what’s relevant in a timely manner. Simply hover over the message you want to pin, click the ellipsis (…) and select the Pin option.
Music mode for Teams
High-fidelity music mode enables Microsoft Teams users to experience richer sound experiences when sharing non-speech content such as live music, songs through other applications, or medical signals during a virtual appointment with a physician. High-fidelity music mode enables significantly improved audio quality in Teams calls and meetings. The optimized experience in Teams applies to signals captured by microphones as well as audio played while sharing an application or desktop.
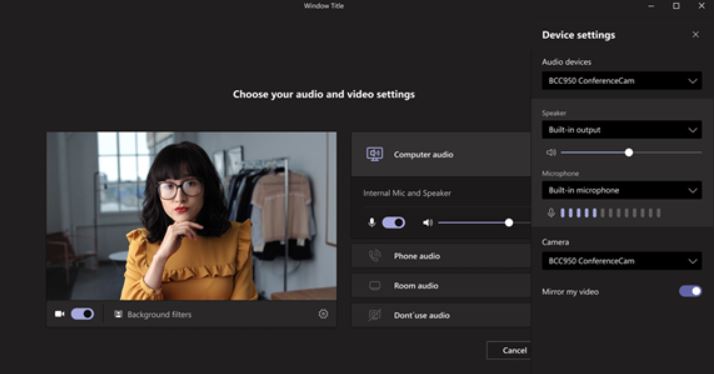
Mirror my video
You no longer have to see the text in your video flipped. Imagine a primary school teacher with a small whiteboard in hand, or you have a virtual background with text in it. While the meeting audience sees the text correctly, you see the text flipped. By providing you with the option to un-mirror, you will be able to see the text correctly. Simply go to your Device Settings and toggle off Mirror my video. Available in Government Community Cloud (GCC).
What do you think is the best update that Teams has made so far in 2022? Are you waiting for any special changes?


 Like all businesses, we don’t change our IT infrastructure every year. We upgrade and improve it over time. Even while providing the latest infrastructure to clients, including cloud-based systems, there was no ‘cloud’ switch to flick built into ours, and we were a very office-centric business.