Site Installation Package — Mac Agent
You can use the Site Installation Package to create a one-click Remote Worker installer package for a target Client and Site. When the installer package runs on a device, it adds the Device to the target Client and Site on the N-sight RMM Dashboard.
For example, end users could run the install package on their devices, or a script could run it on many devices, to deploy the Agent.
To create a Remote Worker installer package:
- You must have a user role with Site Installation Package permission.
- On the N-sight RMM Dashboard, go to Agent > Download Agent > Download Site Installation Package
- The Download Site Installation Package dialog opens with information about the types of packages.
- Click Next
- Select the target Client and Site
- This dialog is Client Group aware and only lists Clients assigned to the logged in user.
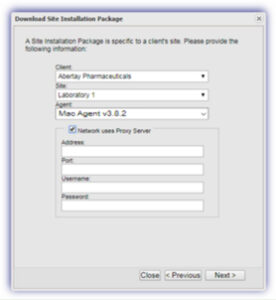
- Select the Agent version you want to install
- Select Network uses Proxy Server and enter the Address, Port, Username, and Password (optional)
- Click Next
- The available installers for the Agent version display. Only the Remote Worker installer is available for Mac and Linux Agents.
- Click Download for the Remote Worker installer
- Each package filename includes the Client, Site and installer type, (GP Group Policy or RW Remote Worker). For example, AGENT_CLIENT_SITE_V8_0_0_RW.ZIP
- Select Close to exit the dialog
- To avoid authentication issues, if the username or password used to create the Site Installation Package changes, we recommend you generate and use a new package based on the updated credentials.
Deploy the Agent
- Distribute the Remote Worker Site Installation Package containing the install.pkg and settings.ini files to the target users.
- The user double-clicks on the install.pkg file to begin the installation process.
- The user then navigates through the following sections:
- Introduction
- Destination Selection: install the Agent for all or only the current. Installation disk selection (optional)
- Installation Type: review Destination Selection setting then Install or Change Install Location (goes back to Destination Selection to reconfigure)
- Installation: view progress. Note, the user is prompted to provide their device password to authorize the installation.
- Summary: displays the Agent install state.
- Select Close to exit the Agent dialog.